
Excel E01: Keep quantities and units readable across a team
E01 | English | Beginner | Video 6:42 | Practice about 20 minutes

Watch the E01 lesson on YouTube
Practice files
Download the E01 learner ZIP (10 files, 277 KB)
The ZIP includes the STARTER, result workbook, blank TEMPLATE_SOURCE, genuine XLTX, new workbook from the template, A4 quantity snapshot, lesson guide in Markdown and PDF, official source register and README. Save working copies separately and keep supplied originals unchanged.
One useful result
Build a two-sheet quantity-check workbook with three stable IDs, numeric lengths, explicit metre units and a formula total of 25 m. Then create a blank reusable Excel template. No macros, coding or paid AI feature is needed. Use Excel for Microsoft 365 on Windows desktop; other versions can have different controls. A desktop Excel licence is required for that version.
Start with the supplied example
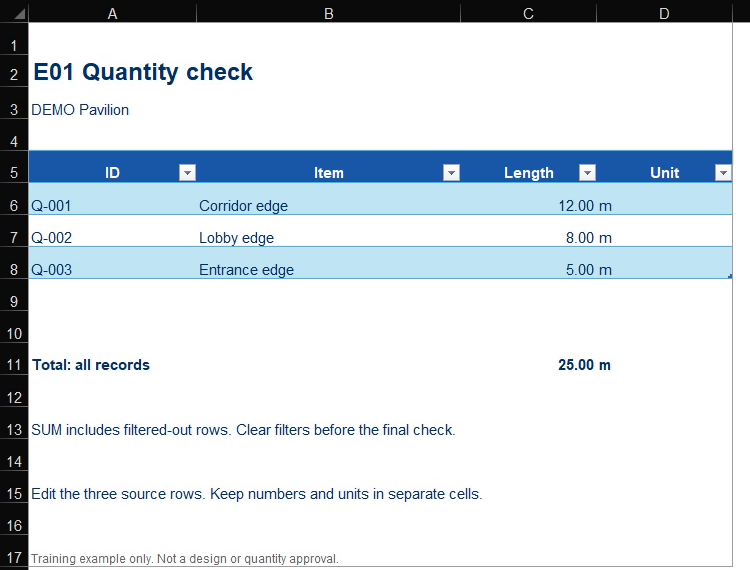
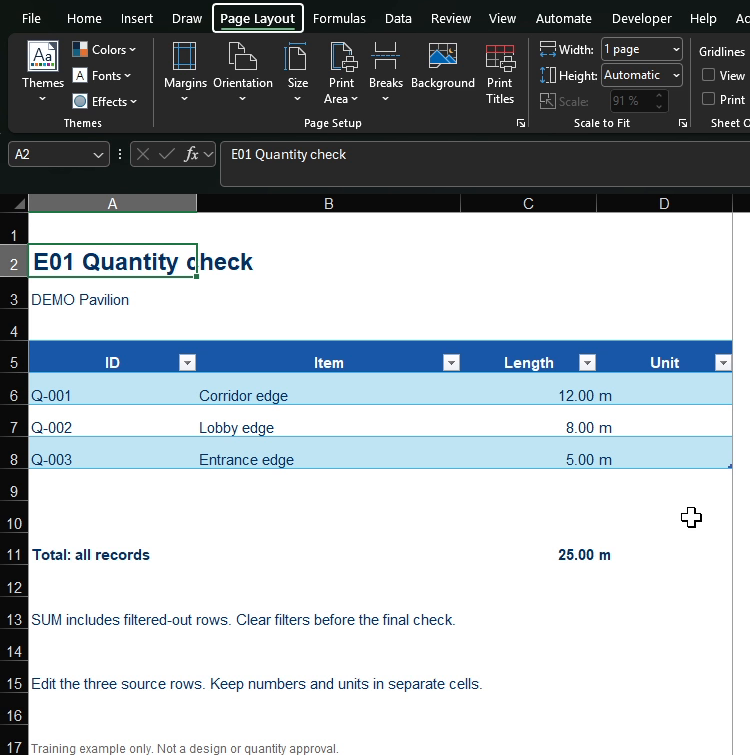
Open the supplied STARTER workbook and save a working copy in a separate practice folder. Keep the supplied originals unchanged. README.txt maps each short role name in this guide to its exact filename. The Quantity check sheet contains the following synthetic DEMO Pavilion input at A5:D8:
| ID | Item | Length | Unit |
| Q-001 | Corridor edge | 12 | m |
| Q-002 | Lobby edge | 8 | m |
| Q-003 | Entrance edge | 5 | m |
The Read me sheet owns the project name in B3 and the unit in B5. The title context and total unit on Quantity check link to these cells. Changing these labels does not convert the numbers. Never relabel millimetres as metres without a separately checked conversion. The row units stay explicit so mixed units remain visible.
1. Turn the range into a real table
Select A5:D8, choose Home > Format as Table and choose a readable style. Confirm the range and that the table has headers. Select a table cell, open Table Design, and enter QuantityTable in the Table Name box. A coloured range alone is not a table. The table should contain all four columns and three data rows.
Keep IDs as text and Length as numbers. A unit belongs in the Unit column, not inside a numeric value such as “12 m”. Do not change regional settings to fix this example. All supplied quantities are whole numbers.
2. Calculate, then challenge the result
In C11 enter =SUM(QuantityTable[Length]). Leave the label “Total: all records” visible. The expected result is 25.00, with m in D11. The formula uses the table and column names, so its purpose is easier to inspect than a long list of cell additions.
Check 12 + 8 + 5 independently. Change C6 from 12 to 14: expect 27.00. Undo and expect 25.00 again. A total alone does not prove the source is complete. Confirm exactly Q-001, Q-002 and Q-003, no duplicated IDs, all three numeric lengths and three m units. SUM includes filtered-out rows: filtering does not turn this into a visible-rows subtotal. Clear filters before the final check.
If a total is 13 instead of 25, inspect C6: a text value “12” can be ignored by SUM. Re-enter 12 as a number. Do not replace all punctuation or automatically convert the entire workbook without understanding the source.
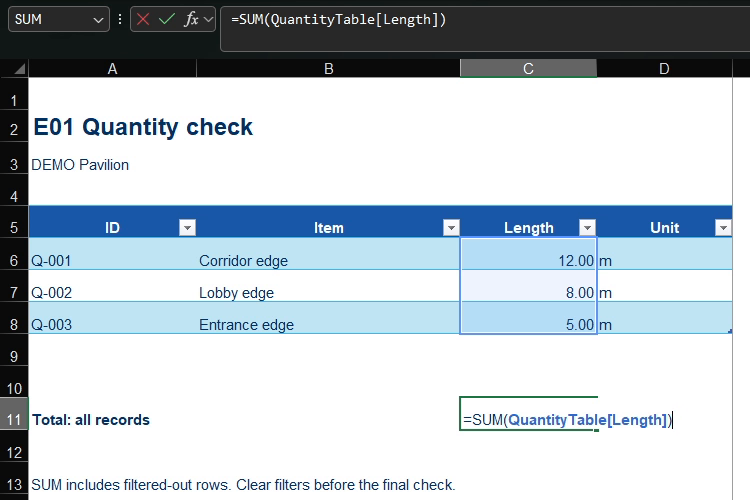
=SUM(QuantityTable[Length]). Check 25 m independently, then test 12 → 14 → Undo. Open full-size screenshot3. Use styles and meaningful file information
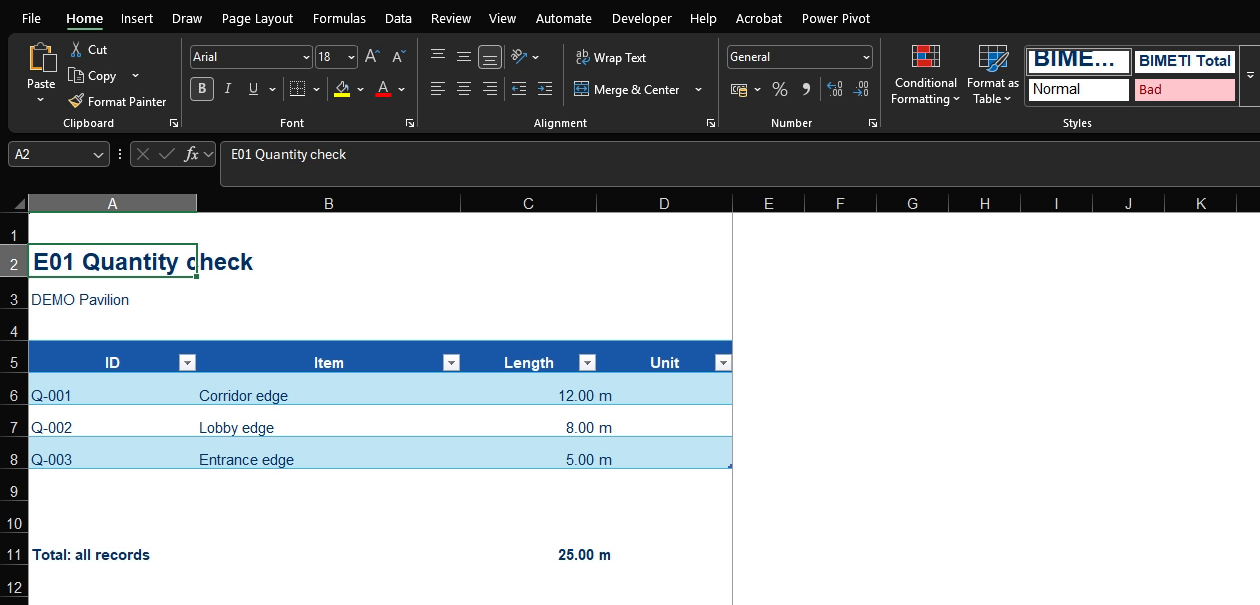
Use Table Styles for the table and Home > Cell Styles for repeated headings or totals. If a style is unsuitable, modify or create the style rather than manually changing every matching cell. Save the corrected reusable style in the master template intentionally. Existing workbooks do not automatically inherit a later master change.
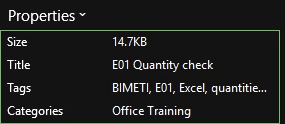
Use File > Info to review the file properties. Set Title to “E01 Quantity check”, Subject to “Beginner Excel AEC quantities”, Author to the actual author, and Tags to “BIMETI, E01, Excel, quantities, metres”. Keep the Read me values accurate, including your working version and status. The supplied workbook Read me sheets retain v01; their filenames identify the supplied file revision. Cells and file properties are different stores: a worksheet label does not automatically update an Office property. This lesson uses cell references for shared worksheet labels, not Word Quick Parts.
Clear names and metadata help people distinguish files and support indexing and search where the storage system indexes those fields. They do not guarantee every search service will find a file. Search for E01 and inspect the result in your chosen storage location.
For your own result, use DEMO-BIMETI-QUANTITY_CHECK-001-EN-v01.xlsx in your practice folder. Hyphens separate naming fields, while underscores join words within a field. ISO 19650 calls for information containers to have unique identifiers following an agreed, documented convention. Our file-naming approach applies this principle through consistent, clearly defined fields. On a live project, use the naming rules in the project information standard and any applicable national annex. The exact DEMO fields and underscore usage here are the course implementation, not universal ISO-prescribed fields. Avoid names such as final_final2. Save a new version for deliberate material changes.
4. Save and prove the reusable template
Save your completed XLSX separately. Open the supplied TEMPLATE_SOURCE XLSX, which retains the structure, formula and guidance but has blank input cells A6:D8. Keep the headers, QuantityTable and the formula in C11. Set the project guidance in Read me!B3 to Enter project name. Save As and choose Excel Template (*.xltx), using DEMO-BIMETI-QUANTITY_CHECK_TEMPLATE-001-EN-v01.xltx in your separate practice folder. Changing the extension alone is not conversion. A ready-made blank XLTX is also supplied for comparison; keep that supplied master unchanged.
Create a new workbook from your template, set Read me!B3 to DEMO Pavilion, enter the three records, and confirm 25 m again. Check that the title on Quantity check now shows DEMO Pavilion. Save the new workbook as a separate XLSX. Inspect the master without saving changes to confirm its input rows are still blank. Its zero sum before entry is not a valid quantity result.

Use your personal template library
- Choose File → Options → Save → Default personal templates location and enter the folder path you want to use. Follow your organization’s policy before changing this setting.
- Place your genuine .xltx template in that folder. Keep the reusable master separate from project working files.
- Choose File → New → Personal and select the template to create a new workbook.
- Save that new workbook separately as .xlsx. Check the source master remains unchanged.
This library makes the template an optional personal choice. It does not replace Excel’s global default for every new workbook.
Finish and check
Retain both sheets, the native table, editable formula and accurate properties. For a PDF snapshot, export the intended quantity sheet, inspect the page and then inspect the PDF properties. Check Title, Author, Subject and Keywords rather than assuming metadata survived. The supplied A4 snapshot had these four fields set explicitly after native printing; it is not evidence of automatic metadata transfer. Custom properties and worksheet cells are not guaranteed to become PDF metadata. PDF and CSV are not replacements for the editable XLSX or reusable XLTX.
Success means three intact unique IDs, 12/8/5 as numbers, all units m, total 25 m, the change-and-undo test passed, a new file created from a genuine blank XLTX, and the master unchanged. Today, complete that one check before expanding the workbook.
A structured source for the next tools
“Smart table” here means a native Excel Table, named QuantityTable, not a painted cell range. Keep one record per row, stable unique IDs, consistent column names, numeric Length values and explicit units. Avoid merged cells or extra subtotal rows inside the source table. This makes the same small dataset easier to check and reuse.
Power Query is Excel's Get & Transform workflow. Microsoft documents creating a query from an Excel Table through Data > From Table/Range. A later lesson will set column types, clean a copy and refresh it. E01 establishes the source structure only; no query or connection has been executed here. In BIM workflows, stable IDs, consistent data types and explicit units help other tools read Excel data reliably. Structured data reduces repeated typing and makes large quantity calculations easier to inspect. Good data management can reduce error risk, avoid costly rework and save time and budget, but a table alone cannot guarantee accuracy: validate the source, mapping, units and result.
AutoCAD 2027 has native Excel Data Links for drawing tables, with updates managed through DATALINKUPDATE. Its data-extraction workflow can match records by a shared key. Paths, selected ranges, installed Excel and unique matching values need checking. An Excel Table name alone does not create a connection or guarantee the linked range expands.
Revit 2027 can export a schedule as delimited text for Excel. That export is not a live two-way spreadsheet connection. For controlled data write-back, a later lesson must select and validate a version-compatible Dynamo graph or add-in, map stable identifiers and units, and test on a model copy with human approval. Dynamo documents Excel import/export capabilities, but node availability depends on the installed version. DiRootsOne SheetLink supports controlled export/import of model parameters and schedule data between Revit and Excel, including Revit 2027. It is not a continuously updating real-time connection. TableGen is the separate DiRootsOne tool for bringing spreadsheet tables into Revit views; do not confuse it with SheetLink parameter and schedule exchange. SheetLink currently requires a Premium licence; check the current product licensing before adopting it. Test any import on a model copy with stable IDs and checked units. No Revit model update, DiRoots workflow or cross-app link is demonstrated in E01.

Official reading
- UK BIM Framework: ISO 19650 guidance, Part 2 — Processes for Project Delivery (Edition 3)
- DiRoots SheetLink: supported Revit and Excel exchange
- SheetLink schedules documentation
- DiRootsOne tools and current licensing
- Create and format tables
- Using structured references with Excel tables
- SUM function
- Apply, create, or remove a cell style
- Save a workbook as a template
- View or change Office file properties
- Import from an Excel table with Power Query
- AutoCAD 2027 Data Link Manager
- AutoCAD 2027 linking and matching Excel data
- Revit 2027 schedule export
Training example only. Not a design or quantity approval.